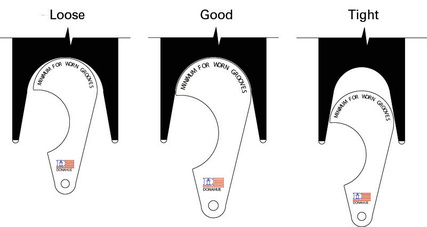
- Place the wire rope in the proper size gauge. Make sure the wire rope is oriented properly, from the top of one strand to the top of the directly opposite strand.
- If the wire rope does not fit in the gauge, repeat with a larger size gauge until the wire rope fits in the gauge.
- Shine a light behind the gauge.
- Check for light between the gauge and the wire rope. If you detect light, repeat with a smaller size gauge until no light shows between the wire rope and the gauge.
Use a wire rope sheave gauge only to APPROXIMATE wire rope diameter:
1 Comment
Want to find out the latest in equipment while building relationships in the industry? Check out these seven events this fall:
Guadalajara, Mexico, September 10-12, 2015 Expo Guadalajara Latin America's biggest expo for hardware, electric, and construction. Register. Los Angeles, September 15-17, 2015 WESTEC Find out about latest technologies in areas from software to cutting tools from top international equipment manufacturers. Register. Milan, Italy, October 5-10, 2015 EMO MILANO Learn about cutting edge machine tools in metal working. Register. Phoenix, October 11-14, 2015 GAWDA Annual Convention Make connections at the Gases and Welding Distributors Association annual event. Register. Las Vegas, October 21-13, 2015 National Industrial Fastener & Mill Supply Expo A gathering of manufacturers and distributors of industrial fasteners, precision formed parts, and fastener machinery and tooling. Register. Phoenix, November 8-10, 2015 STAFDA's Annual Convention Meet distributors of specialty tools and fasteners. Register. Chicago, November 9-12, 2015 FABTECH North America's largest metal forming, fabricating, welding, and finishing event. Register. When you want to produce metal parts, your goal is to think through as many aspects of your final part as possible. Here are 10 factors to consider when producing metal parts at high volume:
Before you have your tooling created, you'll want to consider these 10 factors when working with an engineer to develop your final metal stamping. Want to know what to expect when you scale up? Here are three simple steps we'll walk you through to get your metal parts from idea to mass production:
PHASE 1: Develop Drawings & Specifications
PHASE 2: Create Tooling & Samples Test samples. We’ll send you samples to test in your manufacturing process to make sure parts are exactly to print after our toolmakers finish creating a tool to stamp your metal pieces. PHASE 3: Bring Your Product To Market Plate your parts. You may choose to plate in cadmium, chrome, copper, nickel, or zinc or anodizing on aluminum for an attractive, colorful finish. Meet customer demand. We’ll put the finishing touches on our process, creating inspection sheets and gauges to give you the best quality parts, and ship your parts on time and at lower freight costs than overseas – so you can concentrate on making your customers happy. When purchasing grinding wheel components, you can save money in several ways:
|